Friday, October 30, 2009

Tomorrow is Halloween...

So I guess I will show the kids' costumes.
I have photos without them in the costumes....the ones with them actually wearing the costumes will come after trick-or-treating and such .


Maia is going to be Tinkerbell. I followed (and modified/customized) Simplicity pattern 0549. I did not make the wings included in the pattern. Instead, I made some from coat hangers, stockings, and fabric paint.


Sean is going as Peter Pan. For his costume, I bought an over-sized shirt and cut and sewed it to look like Peter Pan's top. The bottom is just a pair of green sweatpants (we didn't want him wearing tights...). The hat I made from crafting felt. The red feather on the hat is from a pack of crafting feathers we have. The belt is made from 3 stips of brown fabric that I sewed together and braided.


As for me, I just wanted something to wear because I have not dressed up for Halloween in awhile. I bought a t-shirt from WalMart that was a mock 'french maid' costume. I made a matching tutu.


I also made the kids some Halloween outfits. I let them pick out the fabrics for them. No patterns were used. Here they are:


Happy Halloween :)

Tuesday, October 27, 2009

My poor, poor car....

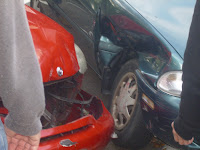
Yesterday, around 3:30 pm, I was sitting in our apartment with the kids...somebody came banging on my door. I looked through the peephole and it was a man from upstairs. I opened up the door, and he immediately says 'somebody hit your car!' (which by the way was parked out in the parking lot). I replied, "my car? are you sure?". He said 'yes, your car! Come!'...I immediately ran outside to see what he was talking about, still not believing that my car had been hit. As soon as I turn the corner from the apartment to the parking lot, I see a crowd of people...most of them looking towards me and shaking their heads. These were the ones who knew it was my car that had been hit. I knew then that it had to be pretty bad...as the crowd started to part, I saw it: (my car is the green one...)


Yeah. It's nice, isn't it? I stood there kind of in schock for a moment. Then the police man came and talked to me and told me what I needed to do and everything....


Apparently the driver was drunk...he turned into the parking lot doing 50-60 mph. He uprooted a fire hydrant, a metal sign, continued down the curb, and finally stopped as he slammed into my car...pushing my car sideways in the parking spot and causing it to hit the car beside it.


Fantastic.


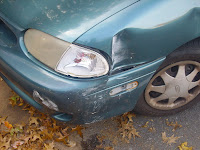
Anyways, because the damage on the car is more than the car's worth...it should be considered totalled. It is immobile due to the front axle being broken....just look at the photos of my tire!


It's horrible. So I am car-less....at least insurance seems to be cooperating though.

Saturday, October 24, 2009

Costumes - Orders I've had

I'd like to share a few Halloween costume orders that I've had through my Etsy shop, and off Etsy. I've also made my kids' costumes, but they are not fully done yet. I will share them when I have all of the things together :)

Here are some costumes I have made for others this year:

Bumblebee (Adult) - The first picture is the costume, the second is the wings, the third is the head piece.


'Ballerina Girl' - The lady who ordered this costume has a young daughter who came up with her own superhero by the name of 'Ballerina Girl'. The mom wanted to surprise her daughter with a costume for Halloween of her made-up hero. We discussed it and came up with this. The firs picture shows the full costume. The second picture shows the cape, the mask, and the wristlets.


'Boo' Costume (from Monsters, Inc) -


Michael Jackson (just the black sequin jacket for a toddler) - The first shows the jacket in regular light. The second is with a flash to show the sparkle.


Fairy Tutus/Pettitutus (for my nieces) -


And those are a few things I've made for Halloween costumes this year. I still have a few more to make, plus mine to finish...and my kids' to finish. I don't mind too much though. It was fun making each one :)

Talking about fears - Halloween.

Young children are sometimes scared by all of the sights and sounds of Halloween. Talk about costumes and noises with your child. Have a discussion about things that may frighten him/her. Let them know that we all have fears...reassure him/her that Halloween is a time of fun and pretending.

Craft: Autumn Placemat

The past few weeks, my 4 year old and I did a few crafts for the fall season. I'm just now getting around to posting them :)

In this post, I'd like to share the autumn placemat that we made on Thursday.

My daughter is always trying to collect leaves from outside and bring them in the house. We usually end up with leaves by the front door, and sometimes she even sticks them in our fridge....So when she wanted to bring some leaves in the other day, I had to think of a way she could keep a few 'pretty leaves' (as she calls them) in the house without them being all over the place. I decided she could make a placemat...that way the leaves would be preserved, and not be crumbled and scattered around.

Here she is the finished product:


Here is how to make your own autumn placemat:

Supplies:
  • Leaves (we used 10) or paper cut-outs of leaves or anything autumn-themed.
  • two matching lengths of wax paper (whatever size you desire your placemat to be)
  • a sheet of newspaper big enough to cover the wax paper
  • iron set on medium heat
  • contact paper or construction paper
  • markers/colored pencils/crayons (optional)

Instructions:
  1. Have your child (or yourself) pick a few nice leaves from outside.
  2. Lay one piece of wax paper down so that the shiny side (the side with all the wax) is facing up.
  3. Have your child arrange the leaves on the wax paper however is desired.
  4. Place the second piece of wax paper, shiny side down, on top of the leaves.
  5. Place a sheet of newspaper over the waxed paper and, with your iron set on medium heat, press the sheets until the wax paper fuses together.
  6. Cut up the construction or contact paper to create a border for your placemat.
  7. Glue the border into place and let dry